
Create Separate Contact Page in Blogger
.

Having a contact page on your blog is highly important. It is how visitors, brands, and companies can reach you and it’s something that every blogger should have. A contact form can serve as an easy way for others to get in touch.
Adding a contact form to Blogger can be done with a few coding tweaks. Blogger actually offers a free contact form for your blog, unfortunately they’ve made it as a Gadget and placed it on the Layout page so that it is added to your sidebar. Not the ideal place for a contact form, if you ask me! It should be situated on its own page, so here’s how to set it up that way:
First, go to the Layout page in Blogger and click an Add a Gadget link. From the popup, choose More Gadgets in the sidebar and then select Contact Form and add it.

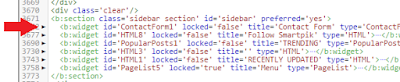
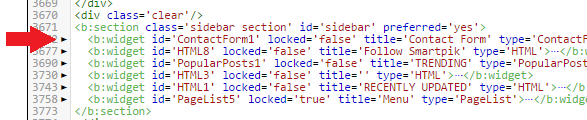
Now, go to the Template page > Click edit HTML page.


Click Jump to widget > Select ContactForm1

Click the small black arrow on the left side to Expand ContactForm1
Click small black arrow on the left side again to expand codes between
<b:includable id='main'> and </b:includable>
<b:includable id='main'> and </b:includable>
Delete the highlighted codes
(all things between <b:includable id='main'> and </b:includable>)

(all things between <b:includable id='main'> and </b:includable>)

After deleting, the ContactForm1 widget code will look like this:
<b:widget id='ContactForm1' locked='false' title='Contact Form' type='ContactForm'>
<b:includable id='main'>
</b:includable>
</b:widget>
Now create a blank page. Click Pages > New Page > Click HTML
Then Copy and Paste the whole code described below, and click Publish
<h2 class="post-title entry-title">
CONTACT US
</h2>
<form name="contact-form">
<span style="color: black; font-size: 1.2em;"><i class="fa fa-user"></i> Name </span>
<input id="ContactForm1_contact-form-name" name="name" size="30" type="text" value="" />
<span style="color: black; font-size: 1.2em;"><i class="fa fa-envelope-o"></i> Email Address </span>
<input id="ContactForm1_contact-form-email" name="email" size="30" type="text" value="" />
<span style="color: black; font-size: 1.2em;"><i class="fa fa-pencil-square-o"></i> Content </span>
<textarea cols="25" id="ContactForm1_contact-form-email-message" name="email-message" rows="5"></textarea>
<input id="ContactForm1_contact-form-submit" type="button" value="Send Message" />
<div style="max-width: 100%; text-align: center; width: 100%;">
<div id="ContactForm1_contact-form-error-message">
</div>
<div id="ContactForm1_contact-form-success-message">
</div>
</div>
</form>
<style scoped="" type="text/css">
#body {background:#edeae1;}
#outer-wrapper {background:transparent;margin:0 auto;padding:0;text-align:left;float:none;background-position:center!important;box-shadow:initial;}
#post-wrapper {background:transparent;width:100%;max-width:100%;margin:0 auto;text-align:left;float:none;background-position:center!important;}
.post-body,.post{background-position:center!important;line-height:normal;}
#blog1,#artikel,.blog-posts{background-position:center!important;}
.banner,#comments,#sidebar-wrapper,#menu-wrap,.back-to-top,.back-to-top.show{display:none;margin-top:0;margin:0;}
.post-inner {padding:0 0 0 0;margin:20px auto;}
#content-wrapper {background-color:transparent;margin:5% auto 2% auto;padding:0;word-wrap:break-word;max-width:520px;}
#BackToTop,.blogouter-wrapper,#comments, #blog-pager, .breadcrumbs, .post-footer,#menutop,.BackToTop,#newsletter,h1.post-title{display:none!important;}
.post {background:transparent;box-shadow:initial;border:0;padding:30px 30px 30px 30px;position:relative;}
.post img {height:auto;max-width:100%;border:0;}
#comments,.post_meta,#blog-pager {display:none;}
#ContactForm1_contact-form-email,#ContactForm1_contact-form-name{width:100%;height:auto;margin:10px auto;padding:12px;background:#fff;color:#444;border:1px solid transparent;box-sizing:border-box;-webkit-box-sizing:border-box;-moz-box-sizing:border-box;transition:all .5s ease-out;border:2px solid #000;}
#ContactForm1_contact-form-email-message{width:100%;height:140px;margin:10px 0;padding:12px;background:#fff;color:#444;font-family:'Open Sans',sans-serif;border:1px solid transparent;transition:all 0.5s ease-out;border:2px solid #000;}
#ContactForm1_contact-form-name:focus, #ContactForm1_contact-form-email:focus, #ContactForm1_contact-form-email-message:focus{outline:none;background:#fff;color:#444;border:2px solid #000;}
#ContactForm1_contact-form-submit{width:100%;font-family:'Open Sans';float:left;background:#000;color:#fff;margin:10px auto;vertical-align:middle;cursor:pointer;padding:15px 18px!important;font-weight:700;font-size:14px;text-align:center;text-transform:uppercase;letter-spacing:.5px;border:1px solid transparent;transition:all .6s ease}
#ContactForm1_contact-form-submit:hover {color:#fff;background:#333333;}
#ContactForm1_contact-form-error-message, #ContactForm1_contact-form-success-message{
width:100%;margin-top:35px;}
.contact-form-error-message-with-border {border:none;box-shadow:none;color:#000;padding:5px 0;}
.contact-form-success-message {border:none;box-shadow:none;color:#000;}
img.contact-form-cross {line-height:40px;margin-left:5px;}
.post h2{background:transparent;position:absolute;top:0;left:0;right:0;font-weight:700;font-size:1.6em;color:#000;display:block;margin:0px 30px;;}
.post h2 a{background:#e76e66;color:#000;position:absolute;display:inline-block;right:0;top:0;padding:16px 26px;font-weight:normal;}
.post h2 a:hover{background:#e76e66;color:#000!important;}
form i{font-family:Fontawesome;font-weight:normal}
.post h2 a i{transform:rotate(0deg);transition:all .6s}
.post h2 a i:hover{transform:rotate(360deg);}
</style>
Create Separate Contact Page in Blogger
 Reviewed by Gokul
on
12/02/2015
Rating:
Reviewed by Gokul
on
12/02/2015
Rating:
Reviewed by Gokul
on
12/02/2015
Rating:
.
No comments: